Hello, how can we help you better?
Account Settings in EngageBay
This guide tells you all about Account Settings in EngageBay
Written by Roy
Updated over
6 months ago
After creating an account with EngageBay CRM, you can customize your CRM experience to your liking in the Account Settings section.
The information you initially provided during sign up will be automatically updated as mandatory fields. However, once you log in, you have the option to modify these details according to your preferences.
Let's have a look at the Account Settings:
Users
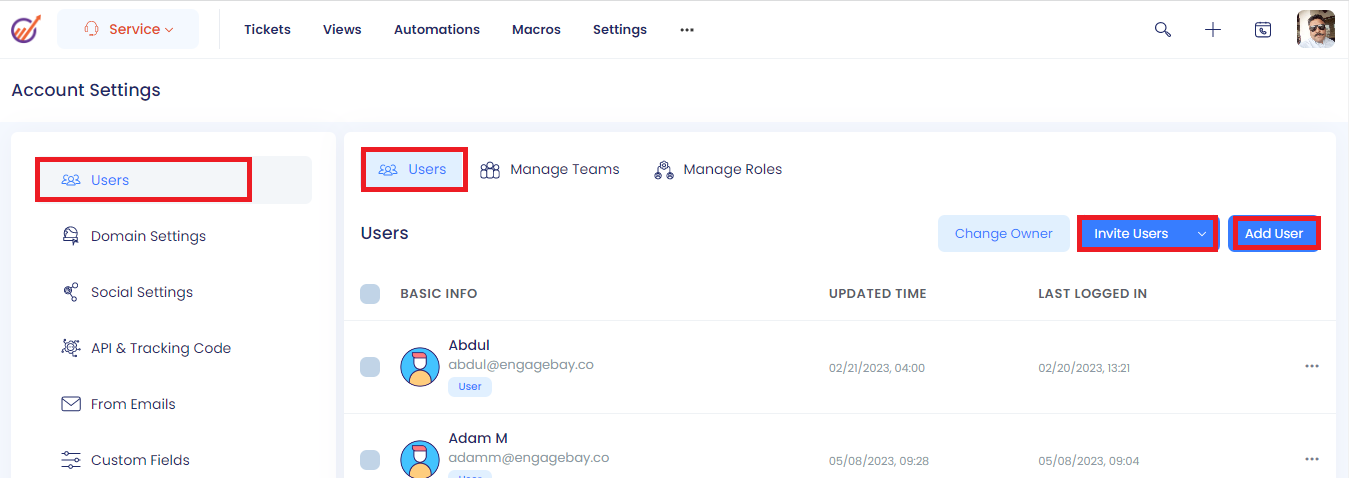
You can add new users / invite new users to your account.
To add a new user: click on Add User and enter the details. Please note that you can assign roles only in the Pro plan
To invite a new user: click on Invite User and enter the email address and select the access level either Admin or User. Please note that you can assign roles only in the Pro plan
To change the owner of the account: please click on Change Owner and select the user to whom you want to make the owner.
To Delete a user: please select the user, and click on the Delete button.
Manage Teams
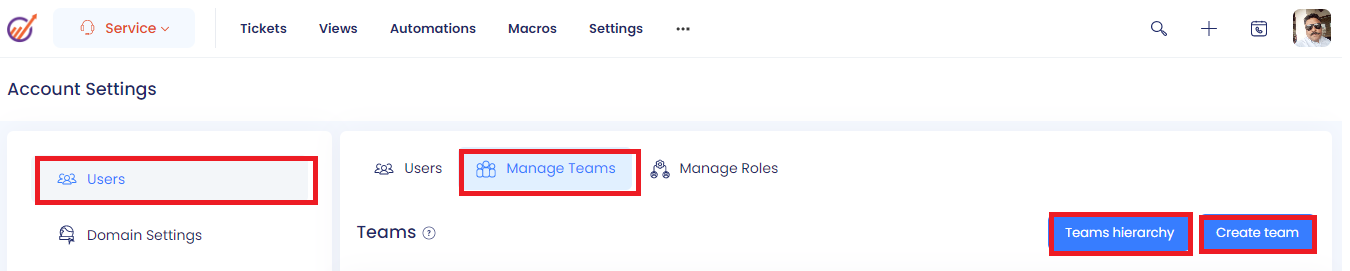
This allows you to create individual groups and apply permissions. It also helps you to monitor the performance of the team.
To create a team, click on Create Team button, enter the team’s name, select the parent team from the drop down, add the users to the team by clicking on search user and click Submit.
Manage Roles
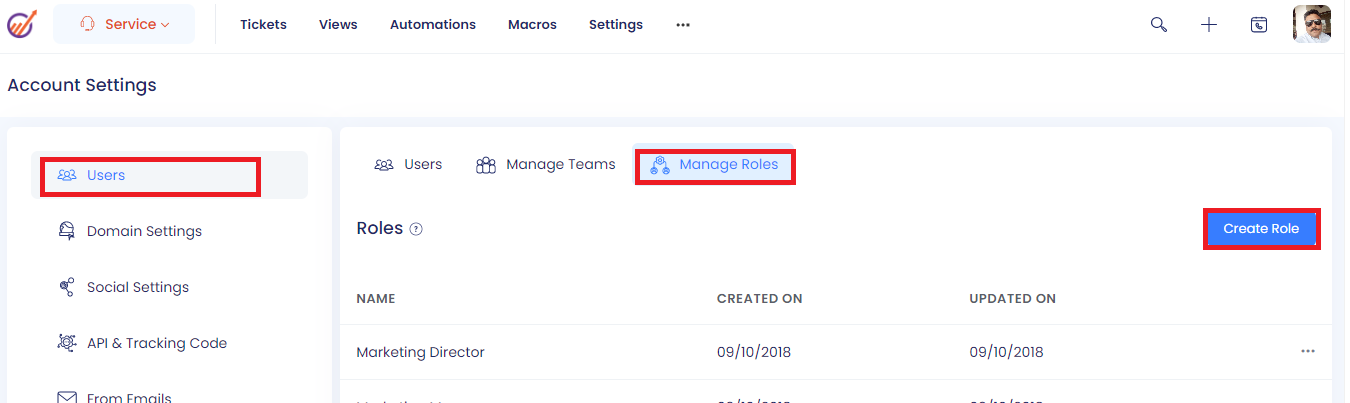
This allows you to create various roles and define individual access controls for each role. You can then assign the role to the user to allow or restrict the access to a specific feature. There are a few predefined roles that you can assign to any user.
If you want to create your own role, please click on “Create Role”, select the permissions from each tab and save the changes.
To edit a role, click the 3 dots to the right of the role and select Edit.
To delete a role, click the 3 dots to the right of the role and select Delete.
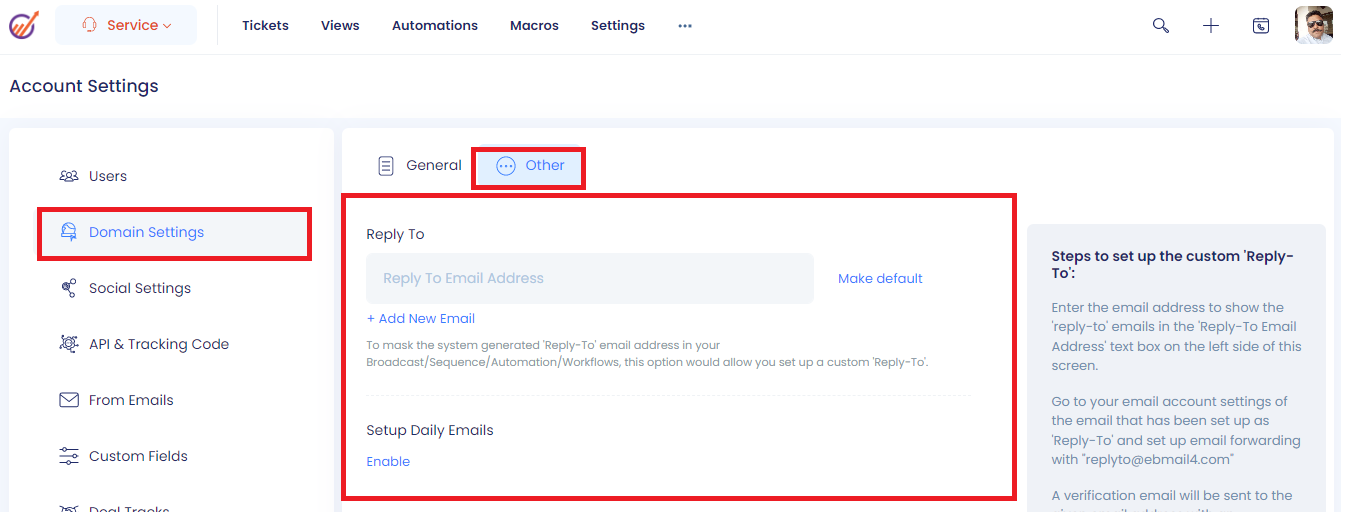
Domain Settings
This allows you to add your Domain name, Company Logo, Website URL, Address, Employees, Industry, Role, Contact Unique Field, and Company Unique Field.
Other: This allows you to add a Reply-to Email to receive the replies. You can also make one Reply-to email as default by clicking on the “Default” link.
Adding Reply-to Email: If you want to receive replies on the same email id that you are using to send emails then it is not recommended to add the reply-to email in the box provided under emails, sequences, broadcasts, automation emails, workflow emails.
However, if you want to add a different reply-to email then please click the profile picture on the top right and select Account Settings--> Domain Settings, click on others tab and add the Reply-to email and save the changes.
If you want to track the replies automatically and perform an action in the automation/workflow then you need to set up an email forwarding in your mailbox to [email protected]. Please note that this is a virtual mailbox just to check the replies and no one monitors it.
Here are the instructions to set up email forwarding:
Go to your email account settings of the email that has been set up as 'Reply-To' and set up email forwarding with "[email protected]"
A verification email will be sent to the given email address with an activation link to enable the forwarding feature.
Click on the link and confirm your forwarding settings to let all your customers see the 'Reply-To' email as the selected email.
Setup Daily Emails: You can enable this option if you want to set a daily sending limit.
One-One Emails:
Show Unsubscribe link – Uncheck this option if you want to remove the Unsubscribe link from the one-one emails
Show Address – Uncheck this option if you want to remove the address from the one-one emails
Email Notification:
Send Unsubscribe Email to Contact Owner - Select the option if you want to send an email notification to the contact owner if the contact Unsubscribes
Send Unsubscribe Email to Account Owner – Select the option if you want to send an email notification to the account owner if the contact Unsubscribes
Compliance Copy Email: Enable this option if you want to receive a copy of all marketing emails sent through broadcasts, sequences, automations, and workflows to the BCC inbox, which can be later reviewed for compliance.
Social Settings:
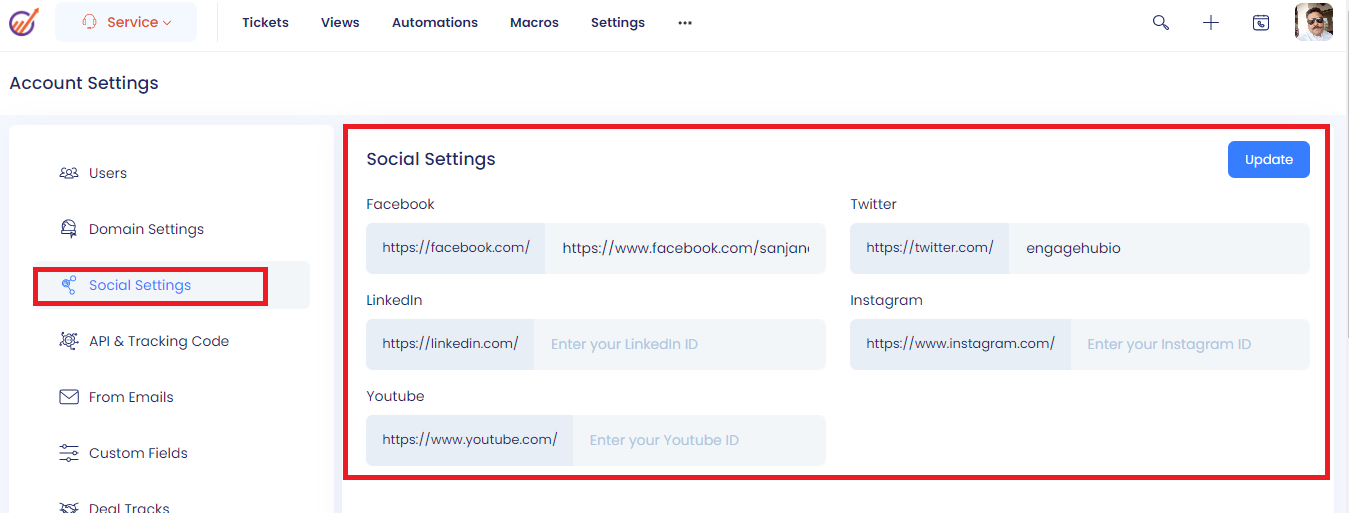
This allows you to add your social media accounts Facebook, Twitter, LinkedIn, Instagram, YouTube.
API & Tracking code: It shows your JavaScript API Key and Rest API Key along with the Tracking code. The tracking code needs to be pasted in the footer or header of the website, so it runs through all the pages of your website.
This is needed for the Forms, Live Chat, and Web Analytics to work.
From Emails:
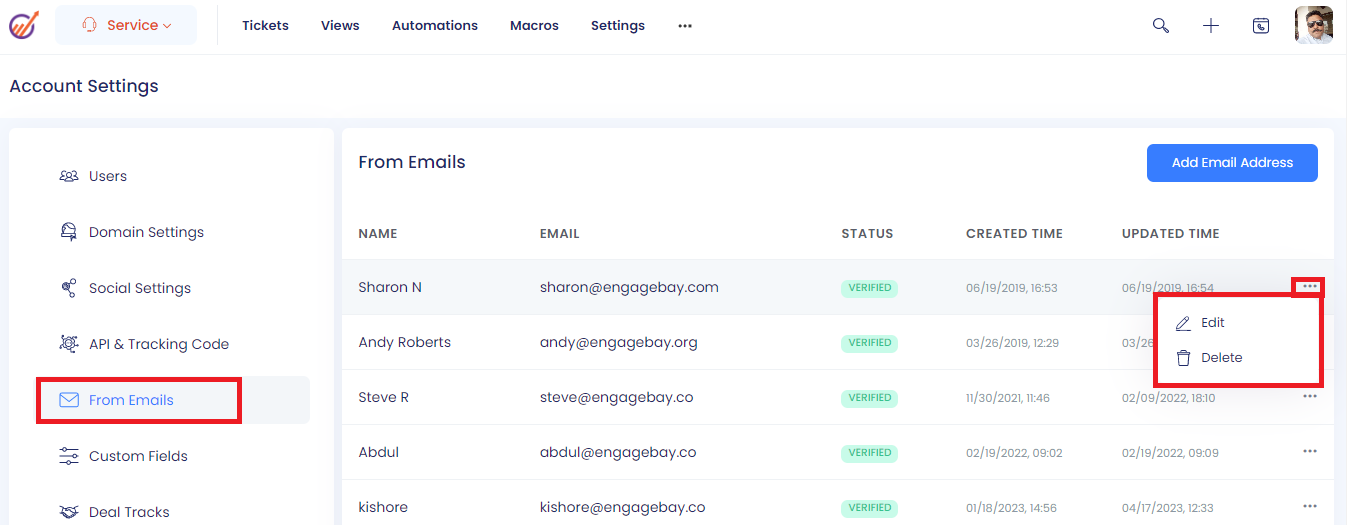
The email addresses added here will be used to send emails.
To add a From Email, click on Add Email Address and enter the name and email address and click Submit. A verification email will be sent to this email address. You need to click on the link in the email to verify it. Once verified you can use it to send emails.
Note: The number of From Emails that you can add depends on the plan and number of users that you have subscribed to.
Custom Fields:
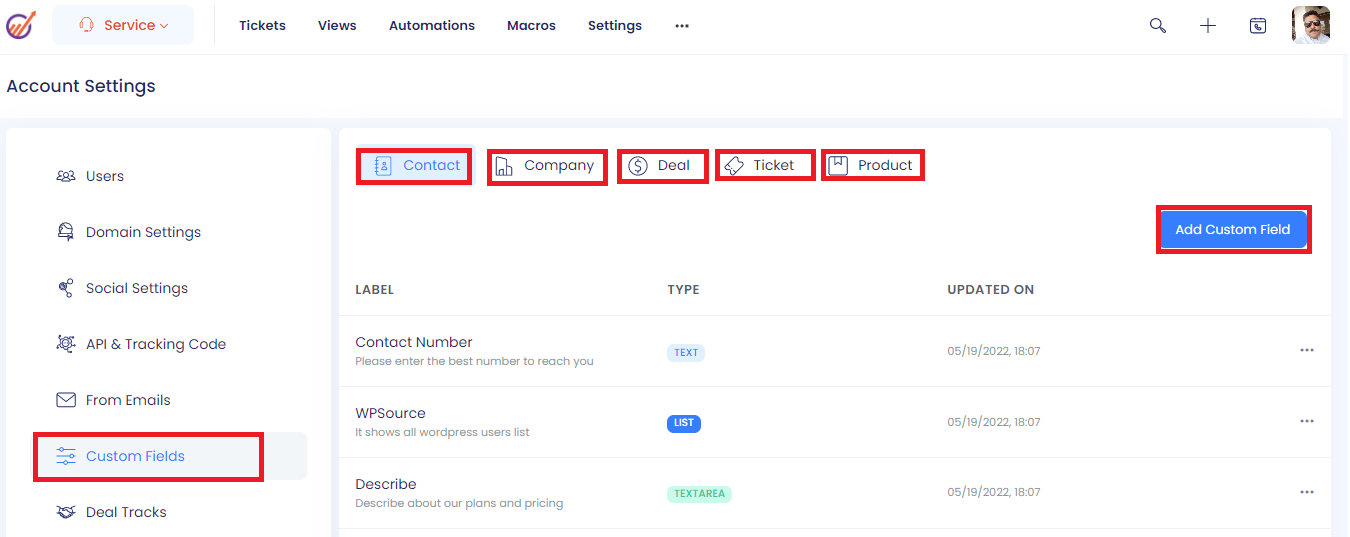
This allows you to add the custom fields to capture the data. You can add custom fields for Contacts, Companies, Deals, Ticket, and Products.
To add a custom field: click on Add Custom Field button, Enter the Label, Description, Select the type of the field, select “Required” if it is a required field, select “Show in Filters” if you want to show this custom field under filters, click the submit button.
Deal Tracks:
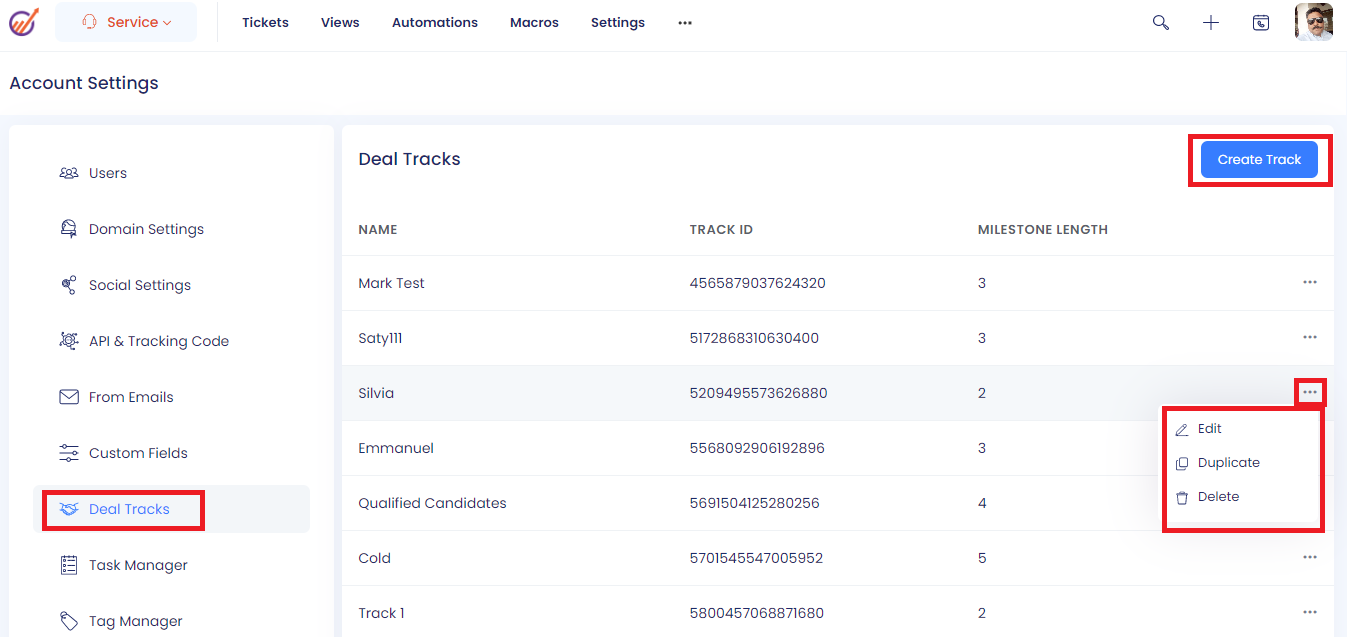
This allows you to create deal tracks. To add or create a deal in EngageBay, you need to first have a deal track properly defined. Based on the nature of the deal and the stages involved in your sales cycle, you need to create different milestones.
To create a Deal Track:
1. Click on Create Track button, enter the track name and drag and drop the milestones to rearrange them. You can even edit, delete, and add new milestones.
2. Configure all the necessary information, such as the milestone name, the probability percentage, and the header color.
3. After defining every milestone, click on Save for the final deal track.
4. You will see the updated or newly created Deal Track listed.
To Duplicate the Deal Track: click the 3 dots to the right of the track name and select Duplicate
To Edit the Deal Track: click the 3 dots to the right of the track name and select Edit
Task Manager:

Task Type: This allows you to create Task Types, like To-do, Call, Email.
To add a new Task Type: click the link “Add Type” and enter the type and click Add
Task Status: This allows you to create Task Status, like InProgress, Waiting, Completed.
To add new Task Status: click the link “Add Status”, enter the status, and click Add
Other Settings:
When a New Task is Created
Send Email Notification: Select this option if you want to send an email notification when a new task is created.
When Task Owner is Changed
Send Email Notification to the Task Owner: Select this option if you want to send an email notification when the task owner is changed.
Tag Manager:

This allows you to manage all the tags. You can edit, delete, and add tags from here.
To add a tag: click Add Tag button and add the tag
To edit a tag: mouse hover on the tag and it shows the option to edit
To delete a tag: select the tag and click on the Delete button.
To delete all the tags: Check “select all tags” and click on the Delete button.
Account Stats:

It shows all your email, account stats and your domain reputation.
DKIM & SPF Settings:

Email servers run email authentication protocols to ensure that the senders are not spamming or engaging in any phishing activity.
It’s crucial to authenticate your domain; otherwise, the recipient's server will mistake you for a malicious sender. To ensure your emails do not reach spam and your links are tracked, authenticate your email servers before sending your first email.
1. To Authenticate your domain, please click on Add Sending Domain and add your sending domain
2. System will generate DKIM and SPF records for your domain.
3. Update the generated DKIM and SPF records in your DNS records. In other words, add the 2 TXT records in your hosting service and then hit Verify to get your domain verified.
Increase your email deliverability by adding DKIM and SPF records and verify the sending domain ownership.
Vanity URL: A Vanity URL helps you retain your own tracking URL across all your emails.
Setting up Vanity URL:
Create a CNAME record in your DNS settings with HOST as 'track' and DESTINATION as 'eb-pages.engagebay.com.
Once done, please click the profile picture on the top right and select Account Settings--> DKIM & SPF settings and click Settings under Vanity URL
Enter 'track' under Subdomain and enter your domain and save the changes.
Note that you need to verify your domain first by adding DKIM & SPF records to your hosting server to configure the Vanity URL.
Predictive Score:

EngageBay’s predictive lead scoring intuitively parses through multiple data points and the scoring criteria that is pre-defined, in order to identify your best leads, automatically. You can pre-define the number points they get (or are deducted) when you set up your lead scoring model.
There are a few predefined rules for adding lead scores that add the score accordingly like:
Inline form source – This adds a score of 5 when an inline form is submitted
Popup form source – This adds a score of 5 when a popup form is submitted.
You can create your rules to add the score, to do that,
1. Please click on Add Score button
2. Please enter the score name
3. Please enter the score
4. Please add the conditions
5. Please click Submit
Once the rule is created, the score will be added automatically if the contact satisfies the conditions.
To edit a rule: click the 3 dots to the right of the rule and select edit
To delete a rule: click the 3 dots to the right of the rule and select delete
Integrations:
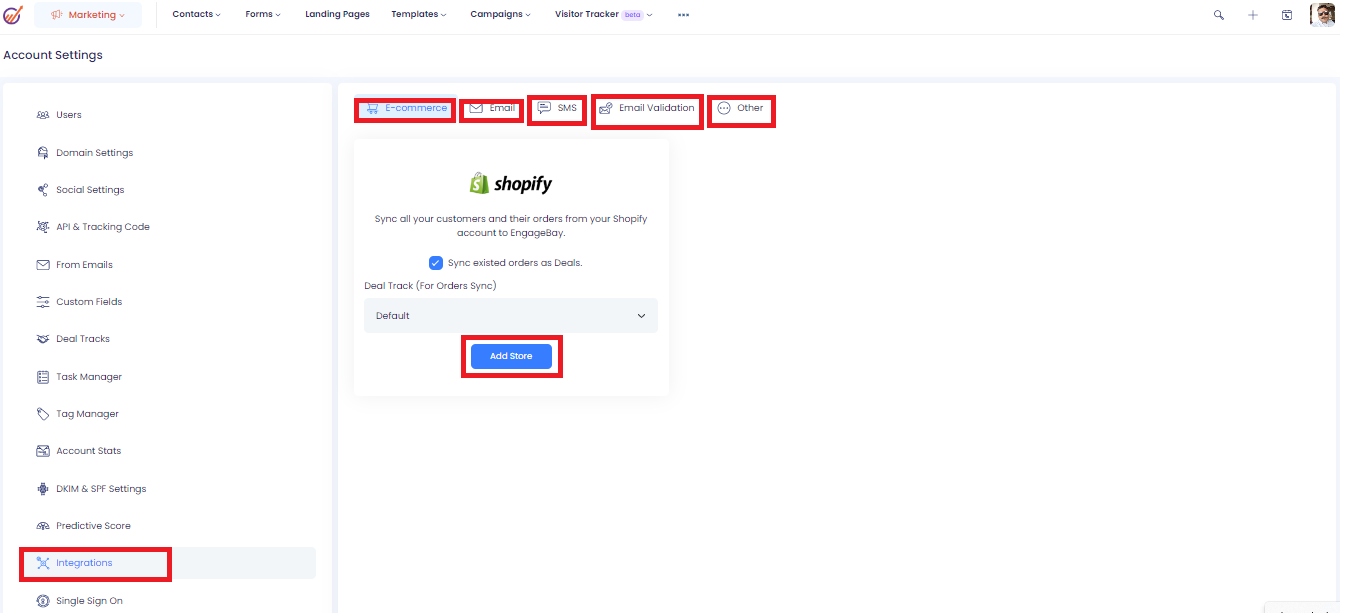
EngageBay allows you to integrate with several ecommerce services, Email services, SMS services, Validation services.
Ecommerce: This allows you to set up an integration with Shopify Store. Once integrated, it syncs all your customers and their orders from your Shopify account to EngageBay.
Email: This allows you to set up integration with several email service providers. The services that we support are Mandrill, Mailgun, SendGrid, Amazon SES, Mailjet, Sparkpost.
SMS: This allows you to set up an integration with several SMS service providers. The services that we support are Plivo, Twilio, Exotel, Vivaconnect, gupshup, Justcall, SMS Country, Voxvalley, BulkSMS, Africa’s Talking, WhatsApp, RingCentral, MessageWhiz.
Email Validation: This allows you to integrate with ZeroBounce to validate your contacts.
Other: This allows you to integrate with reCaptcha, JotForm, Wufoo, DocuSign, Thinkific.
Single Sign on (SSO): Single sign-on is a mechanism that allows you to authenticate users in your systems and subsequently tell EngageBay that the user has been authenticated. The user is then allowed to access EngageBay without being prompted to enter separate login credentials.
Admins and other users can use the SSO option to log in to your EngageBay. EngageBay SSO is implemented using JWT, a widely adopted service that provides a flexible framework for creating a custom SSO solution.
Follow the steps mentioned below to set up Single Sign-On:
- Click on the Single Sign-On under the Admin Settings Tab.
- Enter Remote Login URL, the URL where EngageBay SSO will redirect once SSO is enabled.
- Submit the form to enable SSO
- You can disable SSO by deleting the configured settings.
Unsubscribe Forms:

This allows you to configure the Unsubscribe forms. You can configure the Unsubscribe form, Unsubscribed form, Resubscription form, Unsubscribe Success Email, and Subscription Success
Goals:

This allows you to create a goal for every team member basing the revenue/deals and measure their performance accordingly
Goals can be created for month, quarterly, half-yearly & yearly
To create a Goal:
1. Click on Add Goal button
2. Select the type of the Goal (Sales, Service)
3. Select the Measurement (Deals Created, Deals Revenue, Call Logs)
4. Select the Time Period (Monthly, Quarterly, Half Yearly, Yearly)
5. Select the Users
6. Click the Save button
Field Settings:

This allows you to enable or disable or change the order of the fields under Contacts, Companies, Deals, Tasks, Products, Tickets.
To do that:
1. Click on Edit
2. From the left column select the fields that you want to see
3. From the right column drag and drop to adjust the order of the fields
4. Click Submit
Ads:
This allows you to Create and manage your ads all in a single location.
Sync your ad accounts and start creating relevant and targeted ads for every stage of your buyer’s journey with EngageBay. You can monitor and manage ads across multiple networks from one single location and create custom audiences that may be targeted in just a few clicks. Monitor your ad performance with custom reports and integrate your ads with your marketing tools, such as your CRM.
To enable, please click Connect Account and log in with your credentials.
Webhooks:

Webhooks, in EngageBay, are used to transmit data from your account into another system or database that has an API and can identify and receive webhooks (eg, Zapier). These are driven by occurring events and they allow you to update 3rd party apps with contact activity as they occur.
Webhooks have a number of uses such as pushing notifications and sending data.
- Posts EngageBay contacts data to another system, e.g. to a CRM.
- In order to create a purchase order, webhooks pass on deal data to an external shipment-handling system.
- When a contact fills out a particular form on your site, webhooks send contact data to another system, e.g. to a CRM.
To add a webhook:
1. Click Add Webhook
2. Enter the name
3. Select the Event Type
4. Enter the URL
5. Click Create Webhook
Note: Webhooks is a part of the All-in-One Pro plan
Note: EngageBay does not accept incoming webhooks. You are required to use our API to send information to your account from a 3rd party application.
Conclusion
The Account Settings section in EngageBay CRM provides access to General and Personal settings for your EngageBay CRM account. It enables administrators to view and customize various account configurations. However, these settings are restricted to administrators only and cannot be accessed or modified by Standard level users.
Did this answer your question?


