Hello, how can we help you better?
Calendar in EngageBay
This guide will tell you all about how to set up and view Calendar in EngageBay
Written by Roy
Updated over
6 months ago
The calendar allows you to see your schedule, set up events, and check all your appointments.
It shows you all appointments set up by customers using the online appointment scheduler.
.png)
The tool also allows you to sync your Google Calendar and Office 365 Calendar so that you can see all events associated with those calendars on your EngageBay Calendar.
Viewing Team Member Events/Appointments/Tasks:
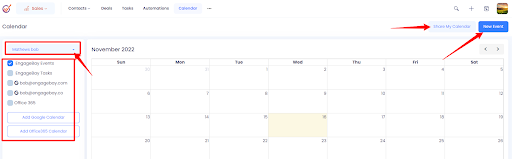
To view your team member events on the calendar, on the left pane you will find a drop down with your username, please click on it and select the user and it will show all the events of that user.
EngageBay Events: To view EngageBay events on the calendar, enable the option
EngageBay Tasks: To view EngageBay tasks on the calendar, enable the option
Add Google Calendar: You can add your Google Calendar using this button
Add Office 365 Calendar: You can add your Office 365 Calendar using this button.
Creating Event:
To create a new event, please click the New Event button on the top right and enter the details of the Event.
Sharing Calendar with Team Members:
To share your calendar with your team members, please click the Share Calendar button on the top right and select the users to whom you want to share with and click the Save button.
Creating a Group Calendar:
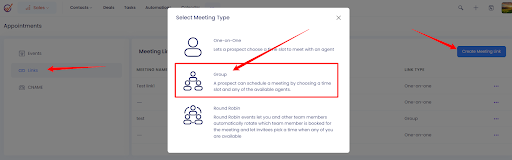
To create a group calendar:
- Please click the 3 dots to the right of the calendar and select Appointments.
- On the left pane you will find Links, click on it.
- On the top right click on Create Meeting Link and select Group
- Select the users that you want to have on the group calendar.
- Scroll down and select the slots or create them, select the business hours
- Click the Save button
To configure an event manually in the EngageBay calendar:
1. Click on New Event in the right side corner of the screen.
2. Enter all information required such as the name of the event, start and end date and time, and the owner’s name. Fill up other information as deemed necessary.
3. You can color tag your event for easy monitoring.
4. Click Save. The event will show up on your calendar.
Easily edit your events by clicking on them and making the necessary changes in the same manner.
Creating Slots:
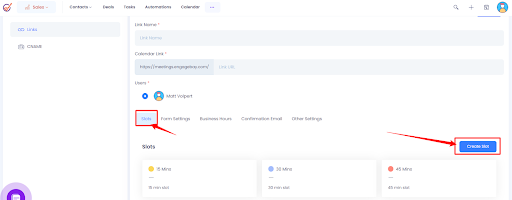
EngageBay lets you display the dates and time slots based on your availability. You can display them in your appointment scheduling link to your customers and let them choose a convenient slot.
To create slots:
1. Navigate to Sales > Appointments.
2. On the left pane you will find Links, click on it.
3. On the top right click on Create Meeting Link or click the 3 dots to the right of the meeting link and select Edit
4. Scroll down and you will find Slots. Click on Create Slot, a new panel pops up.
5. Enter the necessary information, including:
Name: Enter a unique name for your slot
Description: Add details about your slot if you want to
Duration: Choose the duration of your slot availability. It also has the option to choose All Day
Color: Tag your slots with different colors
6. Once done, press Submit.
Configure Calendar
The calendar allows you to see your schedule, set up events, and check all your appointments. It shows you all appointments set up by customers using the online appointment scheduler. The tool also allows you to sync your Google Calendar and Office 365 Calendar so that you can see all events associated with those calendars on your EngageBay Calendar.
To configure an event manually in the EngageBay calendar:
1. Click on New Event in the right side corner of the screen.
2. Enter all information required such as the name of the event, start and end date and time, and the owner’s name. Fill up other information as deemed necessary.
3. You can color tag your event for easy monitoring.
4. Click Save. The event will show up on your calendar.
Easily edit your events by clicking on them and making the necessary changes in the same manner.
Appointment URL
With EngageBay's in-built appointment scheduler software, you can automate the entire scheduling process for meetings, demos, and more. Put your calendar online by sharing your URL so that customers can directly schedule an appointment from the available slots.
1. Go to the Sales dashboard.
2. Click on the three dots (...) right next to the Calendar.
3. From the drop-down menu, select Appointments.
4. In the left pane you will find Links, click on it
5. You will find the calendar links.
You can customize your URL before copying and sharing it with others.
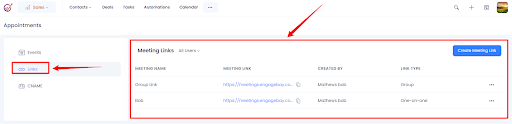
Finding Group Appointment URL:

1. Go to the Sales dashboard.
2. Click on the three dots (...) right next to the Calendar.
3. From the drop-down menu, select Appointments.
4. In the left pane you will find Links, click on it
5. You will find the calendar links. For Group Calendars you will find Group under Link Type
You can customize your URL before copying and sharing it with others.
Customizing Calendar URL
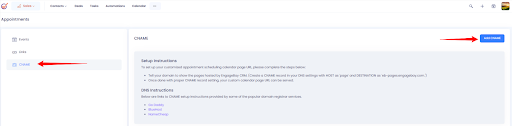
Engagebay allows its users to customize the URL of your appointment calendar and make it look like a URL from your own website.
To set up your customized appointment scheduling calendar page URL, please complete the steps below:
1. You need to create CNAME from your hosting panel first. Tell your domain to show the pages hosted by EngageBay CRM (Create a CNAME record in your DNS settings with HOST as 'page' and DESTINATION as 'eb-pages.engagebay.com.').
The format of the URL of your calendar page will be “subdomain.yourdomain.com/(username or group name). The only part you can customize is the “subdomain.”
If you want the URL to be customized to appointments.yourdomain.com, enter the hostname as ‘appointments’ for the CNAME record and point to eb-pages.engagebay.com. And on the CNAME settings on EngageBay, use appointments as the subdomain and your domain as the domain.
Or if you want the URL to be meetings.yourdomain.com, then enter the hostname as ‘meetings’ on the CNAME and enter meetings as the subdomain.
2. Once you are done setting up the CNAME on the back end of your website, simply proceed to the CNAME option under Sales > Appointments. Enter your configured CNAME on it. If you have SSL, choose HTTPS, if not keep it to HTTP.
3. Click on Submit. Once done with proper CNAME record-setting, your custom calendar page URL can be served.
Customizing Appointment Confirmation Email

Sending customized emails helps enhance your customer experience while controlling your interactions. EngageBay lets you send an automated confirmation email that can be customized as per the requirements.
1. Go to the Sales dashboard.
2. Click on the three dots (...) right next to Calendar.
3. From the drop-down menu, select Appointments.
4. Select Links from the left side column.
5. Click the 3 dots to the right of the link and select Edit. Scroll down and click on the confirmation email tab. You can now edit all kinds of confirmation emails along with rescheduling emails.
6. Once done, hit the Save button on the top right.
Setting up Reminder emails for appointments
Sending appointment reminder emails ensures that both the user and the scheduler don’t miss an important appointment. With EngageBay, you can set up reminder duration and send out automated reminder emails.
1. Go to the Sales dashboard.
2. Click on the three dots (...) right next to Calendar.
3. From the drop-down menu, select Appointments.
4. Select Links from the left side column.
5. Click the 3 dots to the right of the appointment URL and select Edit.
6i. Scroll down and select the Other Settings tab to Send Reminder Email to Scheduler. You will see an On and Off tab, choose On.
7. Set up the time when you want to send a reminder and type the email content.
Once done, it will automatically send out appointment reminder emails to both the user and the scheduler.
Setting up Business hours for appointments:

1. Go to the Sales dashboard
2. Click on the three dots (...) right next to Calendar.
3. From the drop-down menu, select Appointments
4. Select Links from the left side column.
5. Click the 3 dots to the right of the appointment URL and select Edit.
6. Scroll down and select Business Hours.
7. Select the time zone and set up the business hours and select the option to Overwrite user's default business hours
Setting up Calendar Form:
- Go to the Sales dashboard
- Click on the three dots (...) right next to Calendar.
- From the drop-down menu, select Appointments
- Select Links from the left side column.
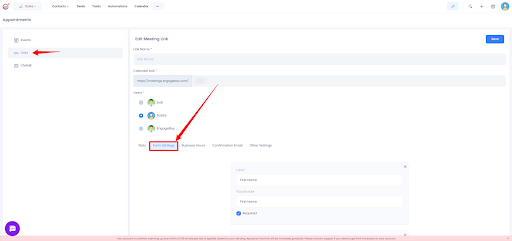
- Click the 3 dots to the right of the appointment URL and select Edit.
- Scroll down and click Form Settings tab
- You can change the label of the forms
- You can add more fields to the form by clicking +Add More
Adding Buffer time/Minimum Notice Time: Buffer time is the minimum notice time you need for your next appointment.
- Go to the Sales dashboard
- Click on the three dots (...) right next to Calendar.
- From the drop-down menu, select Appointments
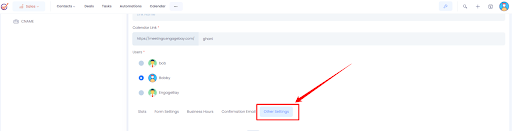
- Click the 3 dots to the right of the appointment URL and select Edit.
- Scroll down and select the Other Settings tab
- Enter the Minimum notice time
- Scroll up and click on Save
Conclusion
Stay productive and organized with EngageBay’s advanced online calendar. Avoid manual correspondence, schedule appointments effectively, and publish your calendar online. Generate more leads and boost your profits.
Did this answer your question?


