Hello, how can we help you better?
Service Desk in EngageBay
This guide tells you all about Service Desk in EngageBay
Written by Roy
Updated over
6 months ago
The service desk is the Single Point of Contact (SPOC) between the service provider and the user for solving and managing the incidence of issues such as outages, plan changes, and user communication.
The EngageBay Service Desk has the following features:
Dashboard Reports:
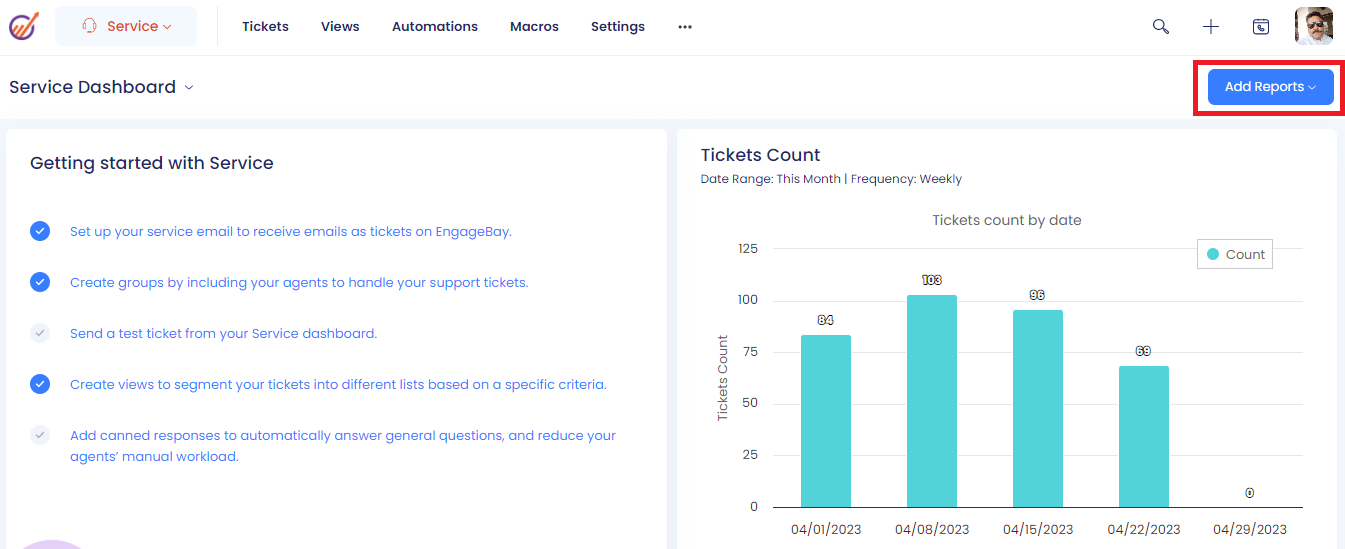
EngageBay offers several reports that can be added to the dashboard. They are:
Tickets Count: It shows all your tickets count with assignee and group
Ticket Priority, Status and Type: It shows all your tickets count information
Tickets Fields Report: It shows field reports
First Response Time: It shows first response tickets count
Closed Type: It shows closed ticket counts
Tickets:
It shows all the tickets. In the right pane you will find a list of views that you can use to filter the tickets.

To create Tickets:
- Log in to your dashboard.
- On the top of your dashboard, navigate to Service > Tickets
- In the upper right, click Create Ticket
- Enter the subject of the ticket
- Assign the ticket to the concerned user
- Enter the content of the ticket and click Submit
Views:

Tickets Views help you organize your tickets by grouping them into lists based on different criteria.
You can create view lists for pending tickets, a view for new tickets, a view for unassigned tickets, and more. These Service Views can help you determine which tickets need immediate attention.
To create Views:
- Log in to your dashboard.
- On the top of your dashboard, navigate to Service > Views.
- In the upper right, click Create Views.
- In the right panel, enter the name of your view.
- Add Condition to the view. All the tickets that satisfy the condition will get added to the view list automatically.
- Once done, click Submit.
A view list will update continuously based on your rules.
Automation:

Automation on the service module is an event-triggered system that automates feature coordination. It has predefined events that connect to a series of actions and/or conditions based on the business requirement.
In other words, it is a sequence of events that you create to help execute various business processes.
EngageBay allows you to trigger automation when a certain action or condition is performed. You can further associate that trigger with another action.
To create Automation:
1. Navigate to Service >Automations.
2. Click on Create Automations in the upper right corner of the page.
3. Set a name for your automation and press Continue.
4. You can now construct visual automation. Click on the name and press Create Automation.
5. It will ask you to choose Triggers.
On ticket status change: Triggers when the status of a ticket is changed
On ticket priority change: Triggers when a ticket priority is changed
On ticket assignee change: Triggers when the assignee of a ticket is changed
Ticket created: Triggers when a new ticket is created
Ticket replied: Triggers when an event is created
Tag added: Triggers when a tag is added to a ticket
Tag removed: Triggers when a tag is removed from a ticket
6. Once selected, you will see the starting point of the automation. You can add two possible outcomes for your entry points by clicking on the Plus icon.
Macro:

Macro is a set of activities that can be performed on your tickets but needs to be triggered manually. It is similar to how the workflow works in the Marketing or Sales module.
EngageBay macros and automation use the same set of actions and conditions. However, the difference between the two is that macro does not have a trigger event. It has to be started manually by execution.
For instance, macros can be used to set ticket properties, add or modify tags, and much more.
To create a Macro:
- Navigate to Service >Macro.
- Click on Create Macro in the upper right corner of the page.
- Set a name for your automation and press Continue.
- Click the big + icon on the top right and add the desired conditions or actions nodes
- Publish the automation and save the changes.
Executing a Macro:
Macro is a set of activities that can be performed on your tickets but needs to be triggered manually. It is similar to how the workflow works in the Marketing or Sales module.

To execute a Macro:
- Once you have saved a macro, you go to a ticket that you want to execute it on.
- On the left panel, click on three dots (⋮) and select Execute Macro.
- Based on what process you want to execute, choose from the existing list of Macros.
- Once done, select Execute.
You can create as many Macros as you would like.
Support Group:
The support group is created for the classification of your help desk team. It helps categorize your incoming service request.
Using EngageBay, multiple support groups can be configured for different purposes, such as marketing, sales, or service with email settings for each group. When an email is sent to a group email ID, the request is automatically sent to the support group created based on the expertise.
To create a support group:
- Go to the Service dashboard.
- Click on Settings right before the three dots (...).
- From the left panel, select Support Group.
- Click the Add Group button available at the right top corner of the Settings page.
- In the Add Group form, enter the group name in the Name field and Support Email ID.
- Select the Users that you wish to group under this Support Group from the available list box.
- Once done, select Save.
You can now view your newly created support group.
Canned Responses:
Canned responses are saved replies to commonly asked questions related to marketing, sales, and service support. They are designed to save your agents’ time and personalize your responses to customer queries. EngageBay even lets you automate responses by setting certain triggers to send out canned responses.
You just need to define conditions, such as ticket number, source of the ticket, or keyword in customer query and let EngageBay respond immediately.
Sending canned responses on EngageBay is easy with intuitive icons and handy shortcuts. You can either choose to create a new canned response or write a new response to a query and save it as ‘canned’ for later use.

To create a canned response:
- Go to the Service dashboard.
- Click on Settings right before the three dots (...).
- From the left panel, select Canned Responses.
- Click the Add Canned Response button available at the right top corner of the Settings page.
- In the New Canned Response form, enter the Name and type in your response.
- Click Save.
You will find all your canned responses in one place. To use them:

- Open a ticket.
- On the right hand side, choose from Canned Responses. Based on your query, select the appropriate response. It will get added to the ticket.
- Then, click Submit.
Ticket Fields:
It consists of type, status and priority
A ticket’s type refers to the type of inquiry being made.
A ticket’s status is basically the lifecycle of a ticket. Every ticket that is created is marked as ‘opened’ by default. It can pass through various statuses ‘pending’ and ‘solved’ before moving to the final status ‘closed.’ A ticket’s status explains whether the customer’s problem is resolved or not.
A ticket’s priority indicates how urgently the tickets need to be responded to. It is only visible to the agents, a way to help them identify which tickets they need to work on first.
Companies can create custom ticket types, statutes, and priorities based on their industry/processes. To add more ticket types, statutes, and priorities.

Setting up Service Module:
For any business, providing superior customer service is of utmost importance. Customers will often contact companies with queries about products or services. When they do, the company must be ready with prompt responses to keep them happy.
Using the EngageBay service module, businesses can enhance customer satisfaction by providing quick sales service.
To get started:
- Log in to your EngageBay Account.
- Go to the Service dashboard.
You can now start creating and viewing support tickets, setting up service automation, and do much more.
Receiving Tickets on Service Module:
With the EngageBay support ticket system, you can keep track of everything that happens around your marketing, sales, and service base. You need to set up forwarding on your mail inbox to the EngageBay service module.
Here are the steps to set it up:
- Go to the Service Dashboard > Settings.
- Copy the email address and log in to your mailbox.
- Go to Settings > See All Settings.
- Under Forwarding and POP/IMAP, click on Add Forwarding Address.
- Paste the email address you copied from the Support Group and click next.
Once you set this up, all the emails coming to your inbox will automatically be forwarded as tickets to EngageBay on your service module.
Assigning a ticket to the user:
While creating a ticket, you can manually evaluate and assign tickets to an agent or a group.
To choose an assignee,
- Go to the Service Dashboard.
- Click on Create New at the right top corner of the Ticket page.
- While adding details of the ticket, you can choose the Assignee name from the drop-down list of users.
- Click Submit.
The assigned user will be notified.
Changing a Ticket Assignee to a different user:
Depending upon how you manage incoming support requests, tickets may automatically be assigned to an agent or a support group. If you want to manually assign a ticket to another agent, follow these simple steps.
- Open a ticket from one of your views.
- On the left panel, you can assign the ticket to a group or an agent. When you click the Assignee field, all your groups and user names are listed alphabetically.
- Select All for a group or another agent as the Assignee.
- Click Submit to update the ticket.
Changing a Ticket Priority and Type:

A ticket’s type refers to the type of inquiry being made. For instance, you may have ticket types for problems, tasks, questions, or incidents. A user, while submitting a question at the help desk, can specify the ticket type. But an agent can also change the ticket type through rules.
Whereas, a ticket’s priority indicates how urgently the tickets need to be responded to. It is only visible to agents, a way to help them identify which tickets they need to work on first.
- To change ticket’s type/priority,
- Open a ticket from one of your views.
- On the left panel, you can change ticket type and priority status for the same. Under ticket information, click the Type and Priority field.
- Choose from the options available. Once done, click Submit to update the ticket.
Conclusion:
EngageBay's Service Desk acts as specialized technical support for the customer, by way of efficient communication at all points of contact.
The focus of EngageBay's Service Desk is to improve the user experience, and therefore the relationship between brand and consumer.
Did this answer your question?


