Hello, how can we help you better?
Campaigns in EngageBay
This guide tells you all you need to know about running campaigns in EngageBay
Written by Roy
Updated over
6 months ago
A campaign aims to develop positive relationships with leads or customers. Campaigns are part of the core activities of EngageBay. However, EngageBay's campaign options are far more powerful and result-oriented than any basic email marketing platform. So, let’s dive into the types of campaigns you can leverage with EngageBay.
This guide offers you a detailed understanding of the five campaign types in the EngageBay Campaigns tab: Email Broadcast, SMS Broadcast, Sequences, Automations, and Workflows.
Email Broadcasts
Sending emails is a great way to build a long-lasting relationship with your customers, and boost customer engagement and loyalty.
Email broadcast in EngageBay allows you to craft an email campaign that can be sent to an entire list of contacts or selected contacts. You can send newsletters, promotional emails, offer emails, and other announcement emails.
Using the EngageBay tool, you can gather enough information to understand users and their interests. Based on that information, you can create a list bound by certain interests or conditions and run a broadcast targeting them.
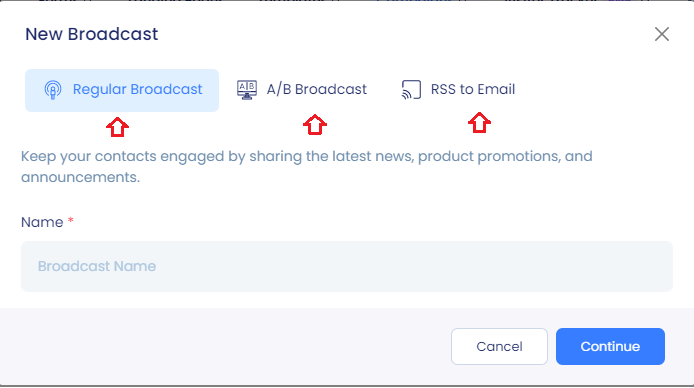
EngageBay offers you three types of email broadcasts:
- Regular Broadcasts
- A/B Broadcasts
- RSS to Email
Create an Email Broadcast
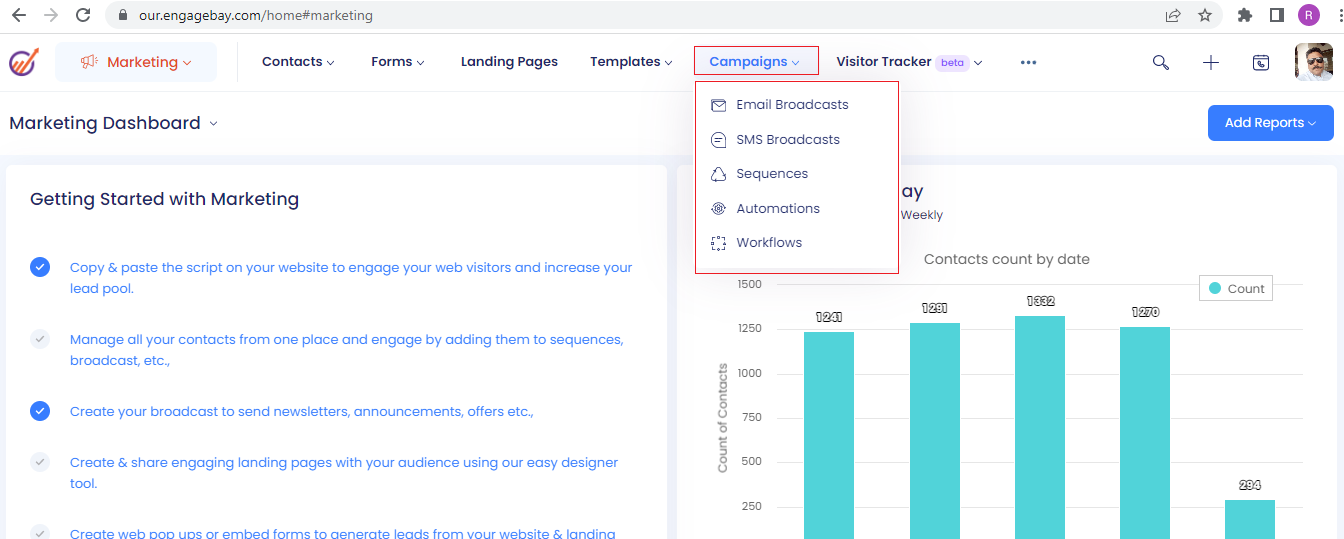
- On your Marketing dashboard, hover your mouse over the Campaigns tab.
- Choose Email Broadcasts.
- In the upper right corner, click on the Create Broadcast button.
- Start by naming your broadcast. Choose Continue.
- Enter Subject Line, ‘From’ Email (it will show who the sender is), and Who it is from (name of the person/company sending the email).
- Once done, click on Next. Under the Recipients tab, choose the list of contacts you want to send an email to. You can send a broadcast to All Contacts, Specified List, or based on a filter.
You need to create the list or filter before sending a broadcast so that it shows on the list as an option.
Choose whether you need to send a plain text email or use an email template. Hit Next.
If you choose plain text, compose your email subject and the body text. You can add various options to format your email message and make it appealing. Click on Next once done. In the case of templates, you will be given an option to choose from pre-designed templates, saved templates, or choose to create a custom template.
Click on the block you want to edit and manually change them. You can adjust the setting of each section from the right-side panel. You can even experiment with the placement of different blocks. Once you are done editing the template, hit Save.
It will take you to the Confirmation section. It gives you the option to review details before sending — From, Subject, Recipient, and Email Content.
Once you check and confirm that all the details are good, click on the Proceed to Send/Schedule button.
You can choose to send it immediately or schedule it for later by selecting the date, time, and timezone.
A/B Broadcast
A/B broadcast allows you to send two variations of the same email to different sets of groups to find out which variation of the campaign garners the best result. A/B broadcasting your campaigns is an excellent way to increase the open and click-through rates of your emails.
It can vary in its nature. It can include A/B tests of sending multiple subject lines to see which one generates more opens, or advanced testing of different email templates to see which one generates more click-throughs.
Create an A/B Broadcast

- On your Marketing dashboard, hover your mouse over the Campaigns tab.
- Choose Email Broadcasts.
- In the upper right corner, click on the Create Broadcast button.
- From the pop-up panel, choose A/B Broadcast and name your campaign. Choose ‘Continue’
- You will notice the A/B version of the email option in the right corner of the screen. A is the first variation of email, and B is the second.
- Start with creating the variation A email. Enter Subject Line, ‘From’ Email (it will show who the sender is), and Who it is from (name of the person/company sending the email).
- Once done, click on Next. Under the Recipients tab, choose the list of contacts you want to send an email to. You can send a broadcast to All Contacts, Specified List, or based on a filter. You need to create the list or filter before sending a broadcast so that it shows on the list as an option.
- Choose whether you need to send a plain text email or use an email template. Hit Next.
- If you choose plain text, compose your email subject and the body text. You can add various options to format your email message and make it appealing. Click on Next once done. In the case of templates, you will be given an option to choose from pre-designed templates, saved templates, or choose to create a custom template.
- Click on the block you want to edit and manually change them. You can adjust the setting of each section from the right-side panel. You can even experiment with the placement of different blocks. Once you are done editing the template, hit Save. You can now start editing variation B and similarly enter all information.
- Next to the A/B tab, you will see three dots (...). Click on it and set the metrics that will decide the winning variation.
- Go to the Confirmation section and review details before sending — From, Subject, Recipient, and Email Content.
- Once you check and confirm that all the details are good, click on the Proceed to Send/Schedule button.
- You can choose to send it immediately or schedule it for later by selecting the date, time, and time zone.
RSS Broadcast
With an RSS broadcast, you can send emails whenever you publish something new. Once you have set the day and time you would like your content to go out, it takes care of the rest. It saves you the time of scheduling emails every time you create new content.
Whether you publish a new blog every day or two case studies a week, EngageBay's RSS-Feed-to-Email feature ensures that your readers never miss an important update.
Set up an RSS Broadcast

- On your Marketing dashboard, hover your mouse over the Campaigns tab.
- Choose Email Broadcasts.
- On the upper right corner, click on the Create Broadcast button.
- From the pop-up panel, choose RSS to Email, name your campaign, and enter the RSS Feed URL. Choose Continue.
SMS Broadcast
SMS is an acronym for short message service. It is one of the most effective multi-channel marketing channels with the highest ROI.
SMS Broadcast in EngageBay allows you to create and run an SMS campaign that can be sent to an entire list of contacts or to selected contacts. It’s an excellent way to send promotional messages, welcome messages, and much more.

Run an SMS Broadcast
- Go to the Marketing dashboard.
- Hover your mouse over the Campaigns tab, and choose SMS Broadcasts.
- On the upper right corner of the screen, click Create Broadcast.
- Enter all the required information under SMS Details including the name of the broadcast, and select the configured SMS provider, messages, and others.
- Select the list of contacts for whom you want to run the campaign, and click Next.
You will now be able to run your SMS campaign.
Actions on Broadcasts:
Preview: To preview a broadcast, please click the 3 dots to the right of the broadcast and select Preview
Delete: To delete a broadcast, please click the 3 dots to the right of the broadcast and select Delete
Duplicate: To duplicate a broadcast, please click the 3 dots to the right of the broadcast and select Duplicate
Download Reports: To download reports of a broadcast, please click the 3 dots to the right of the broadcast and select Download Reports.
Note: The reports will be sent to the admin user of the account.

Changing the view of the Broadcasts

Using the Actions Menu on the top right you can select the columns that you want to display on the broadcast view. To do that, please click on the Actions Menu and select Edit Columns, from the left pane select columns that you want to display on the Broadcasts View and from the right pane drag and drop the position of the columns as per your preference and click Submit.
Download Reports:
To download all the Broadcast reports, please click on the Actions Menu and select Download Report. The report will be sent to your email.
Note: The reports will be sent to the admin user of the account.
Email Sequences
An email sequence is a series of emails that get delivered automatically at a predefined interval of time or a pre-defined trigger. You can set up emails to be sent to a specific contact or a group of contacts.
When an email sequence is trigger-based, emails are sent based on actions such as:
- Browsing behavior
- Subscribing to your list
- Shopping cart abandonment
- Reading or downloading content
- Buying a product
A time-based email sequence (sometimes called an email autoresponder) sends emails at predetermined time intervals, such as:
- Right after opt-in
- 30 days after purchase
- On the anniversary of subscribing
Setting up email sequences enables you to continuously engage with your subscribers and build strong relationships with them. It enhances their experience and improves their value as a lead, leading to the chances of increased conversion. An email sequence is a great way to send regular blog updates, product news, and newsletters.

How to create sequences
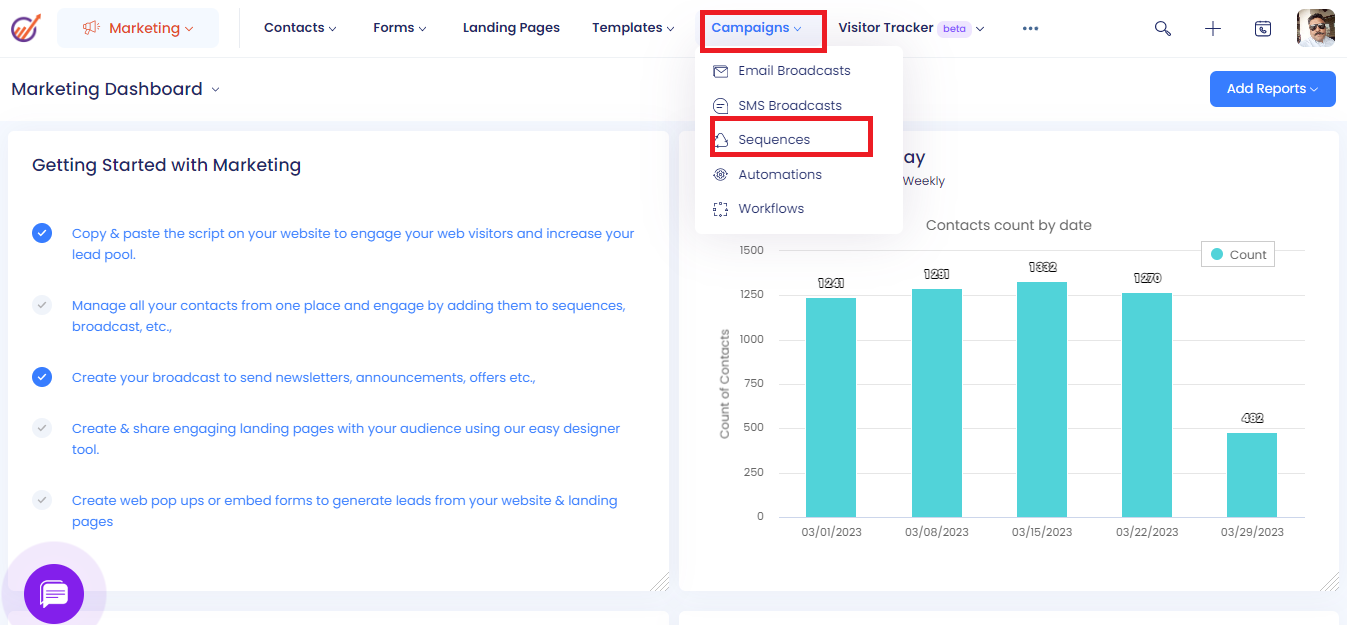
1. Go to the Marketing dashboard.
2. Click on Campaigns.
3. From the drop-down menu, select Sequences.
4. In the upper right corner of the page, click Create Sequence.
5. Under the Content section, you can define when you want to send your emails and the content of the email.
- Delay Sending By: defines the timeline of the sequence of your emails. You can even add certain conditions for sending an email.
- Email Subject: Write a compelling subject line to increase your open rate
- Preview Text: Text that will display on their notification screen
- Email Content: Body of the email
- Attach Files: if you want to send any files/attachments along with the email
You can even personalize every section of your email. If you have any saved email templates, you can use that by selecting from the drop-down arrow right next to the Email Template in the Email Content section.
6. Once all the information has been added, you can Preview your email before sending it.
7. Under Settings, you will see the conditions you have created for sending emails.
8. Press Save.
Actions on Sequences:

Edit: To edit the sequence, please click the 3 dots to the right of the sequence and select Edit
Delete: To delete the sequence, please click the 3 dots to the right of the sequence and select Delete
Download Reports: To download reports of a sequence, please click the 3 dots to the right of the sequence and select Download Reports.
Note: The reports will be sent to the admin user of the account.
Activities: To view all the activities that are performed on the sequence, please click the 3 dots to the right of the sequence and select Activities
Changing the view of the Sequences:

Using the Actions Menu on the top right you can select the columns that you want to display on the sequence view. To do that, please click on the Actions Menu and select Edit Columns, from the left pane select columns that you want to display on the sequence view and from the right pane drag and drop the position of the columns as per your preference and click Submit
Automations
.png)
Automation is an event-triggered system that automates feature coordination. It has predefined events that connect to a series of actions and/or conditions based on the business requirement. In other words, it is a sequence of events that you create to help execute various business processes.
Triggers that you can use on the Automation:
Here is the list of events triggered by an action related to marketing:

Joins a form: Triggers when a user subscribes to the specified Inline form
Joins a popup: Triggers when a user subscribes to the specified popup form.
Joins a sequence: Triggers when a contact joins the sequence specified in the configuration.
Tag added: Triggers when a tag is added to a contact.
Tag removed: Triggers when a tag is removed from a contact.
Link clicked: Triggers when a user clicks on the link embedded within an email.
Opens an email: Triggers when a user opens an email specified in the configuration.
Double opt-in: Triggers when double opt-in is configured and a user subscribes to the specified form - inline, popup, or landing page form.
Has Note Description: Triggers when a contact has a specific note added.
Score changed: Triggers when the score changes and the change matches with the specifications mentioned in the configuration.
Contact created: Triggers when a new contact is created and joins the sequence specified in the configuration.
Cart abandoned: Triggers when a user adds products to his cart and abandons it without placing the order.
Order purchased: Triggers when a user places an order.
Contact updated: Triggers when a contact field is updated.
Web page visited: Triggers when a user visits a web page as specified in the configuration.
Incoming call: Triggers when an incoming call is received.
Outgoing call: Triggers when you make an outgoing call.
Actions and Conditions that you can use on Automations:
Actions are a series of processes that a contact goes through once they enter your automation. Once they satisfy the trigger condition, an action is performed.
To use Actions and Conditions:
- Go to the Marketing dashboard.
- Hover your mouse over the Campaigns tab, and choose Automations.
- In the upper right corner of the screen, click Create Automation.
- You may choose to Start from Scratch (or any other options), and click Continue.
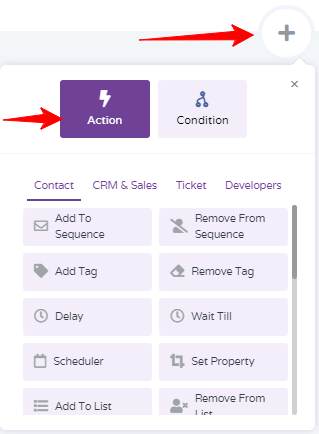
- Click on Start Automation and choose the trigger event. Once done, click on the big + sign to see the Actions and Conditions.
- Based on what action you want to perform when the trigger condition is satisfied, you can choose the action. Then, check if the condition is satisfied.
For instance, if the Action is to Send an email, then the condition can check if they opened the email or clicked on a link on the email.
While creating workflow automation, you can specify the event’s condition to make sure your action is only triggered when an event meets those specific conditions.
Let’s look at each of these and actions and conditions in our automation builder.
Automation Actions
Add to sequence: Add a contact to a sequence
Remove from sequence: Remove a contact from a sequence
Add tag: Add a tag to a contact
Remove tag: Remove a tag from a record/contact
Delay: Delay for a certain amount of time
Wait till: Wait until the following condition is met
Scheduler: Execute an action on a certain date and time
Set property: Set or delete property to a contact
Add to list: Add a contact to a list
Remove from list: Remove contact from a list
Add to form: Add a contact to a list
Remove to form: Remove a contact from a list
Send email: Send an automated email to a contact based on certain conditions
Add score: Add a value to a contact based on an action
Star rating: Give a star rating to a contact — bad, poor, average, great, & excellent
Update contact status: Add a confirmed or unconfirmed status to a contact for sending emails
Send push notification: Send push notification to a contact
Send SMS: Send SMS to a contact
Voice call: Make a voice call to a contact
Add new note: Add a new note for a contact
Assign owner: Assign deals equally among the selected users
Add to workflow: Enroll in another workflow
Remove from workflow: Remove a contact from a workflow
Remove from automation: Remove an action from an automation
Automation Conditions
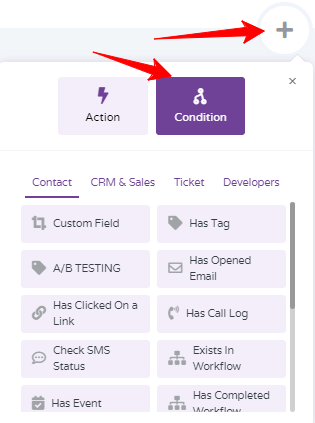
Custom field: If the contact has a certain custom field
Tag: If the contact has a tag
A/B testing: Run an A/B test
Has opened email: If the contact has opened the email within the predefined timeline
Has clicked on a link: If the contact has clicked on a link within the predefined timeline
Has call log: Has a call log within a certain frame of time
Check SMS status: Has checked the status of the sent SMS
Exists in workflow: If a contact is in a certain workflow
Has event: When the subscriber has an event as described
Has completed workflow: If the contact has completed a workflow
Has completed automation: If the contact has completed an automation
Has subscriber replied: If a subscriber has replied within the predefined timeline
Has URL visited: If the contact has visited a URL within the predefined timeline
Has completed broadcast: If the contact was part of a broadcast
Contact score is: When the contact score reaches a certain condition and value
Contact source is: When a contact is added from a specific source
Contact has owner: When the contact has a specific owner as mentioned
Other actions on Automations:
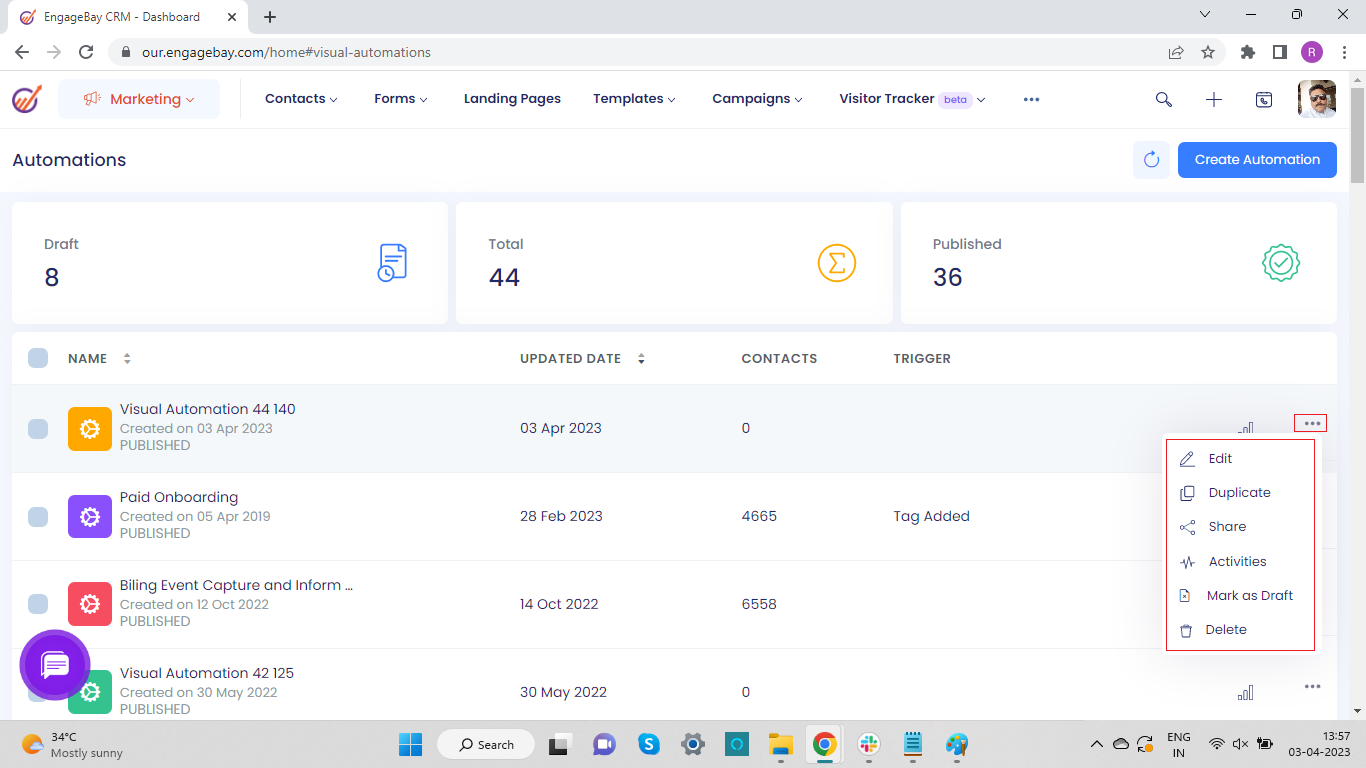
Edit: To edit the automation, please click the 3 dots to the right of the automation and select Edit
Duplicate: To duplicate the automation, please click the 3 dots to the right of the automation and select Duplicate
Share: To share the automation, please click the 3 dots to the right of the automation and select Share. It will ask you to enter the email address of the user, please enter it and the automation will be added to the account of that user. Note: You can share it with the users of other EngageBay accounts only.
Activities: It shows the activities that are performed by the user on the automation. To view the activities, please click the 3 dots to the right of the automation and select Activities
Mark as Draft: To make the published automation as draft, please click the 3 dots to the right of the automation and select Mark as Draft
Mark as Published: To make the draft automation as published, please click the 3 dots to the right of the automation and select Mark as Published.
Delete: To delete the automation, please click the 3 dots to the right of the automation and select Delete
Workflows
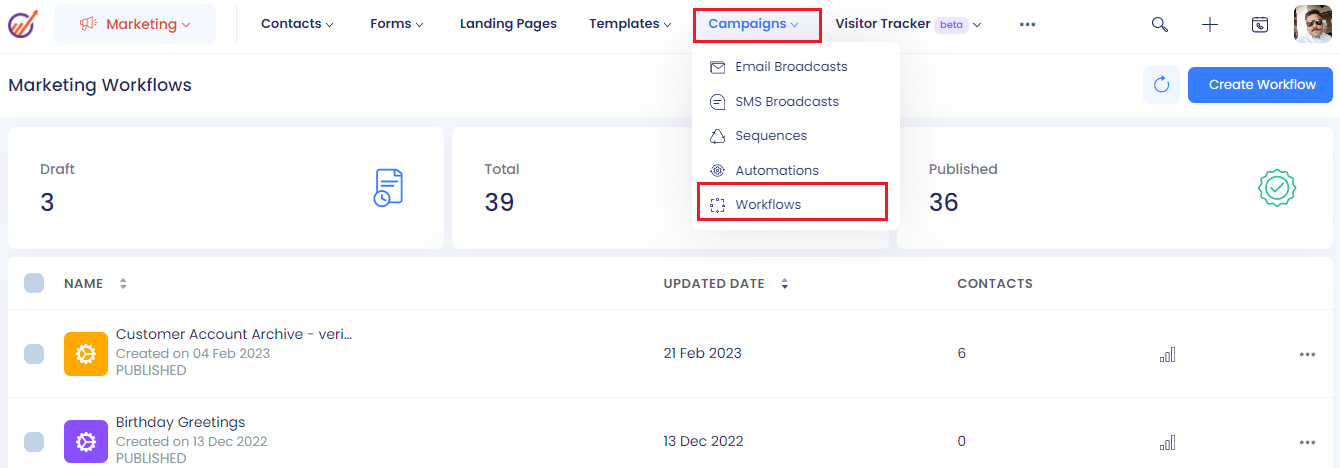
Workflow is a set of activities that comprises the process of performing a task from the start to the end. Having a platform to handle or automate these processes can significantly increase the efficiency of your business.
EngageBay workflow is a series of Actions or Conditions or a combination of both that can be triggered by execution or automation.
Other actions on Workflows

Edit: To edit the automation, please click the 3 dots to the right of the automation and select Edit
Duplicate: To duplicate the automation, please click the 3 dots to the right of the automation and select Duplicate
Share: To share the automation, please click the 3 dots to the right of the automation and select Share. It will ask you to enter the email address of the user, please enter it and the automation will be added to the account of that user.
Note: You can share it with the users of other EngageBay accounts only.
Activities: It shows the activities that are performed by the user on the automation. To view the activities, please click the 3 dots to the right of the automation and select Activities
Delete: To delete the automation, please click the 3 dots to the right of the automation and select Delete
Download Reports: To download the reports of the automation, please click the 3 dots to the right of the automation and select Download Reports
Viewing Reports of the Automation/Workflow:

To view the reports of the Automation/Workflow, please click the graph icon on the right of the automation. On the new page that appears there will be a drop down on the top right with the following options:
All Contacts: It shows all the contacts that are on the Automation.
Active Contacts: It shows all the Active Contacts on the Automation
Completed Contacts: It shows all the Completed contacts on the Automation. Completed contacts are the contacts on which the automation is completed.
Recipients: It shows all the recipients.
Delivered: It shows all the contacts to which the emails were delivered
Opens: It shows all the opens
Unsubscribes: It shows all the contacts that unsubscribed
Spams: It shows all the contacts that reported your emails as spam.
Soft Bounces: It shows all the contacts on which the emails have soft bounced
Hard Bounces: It shows all the contacts on which the emails have hard bounced.
Using Bulk Action
You can use the bulk action to add a tag to the selected contacts or add the selected contacts to a Static List.

In the left pane you have the option for Email Reports and SMS Reports
Email Reports: It shows the reports of all the emails that are sent through the automation.
SMS Reports: It shows the reports of all the SMSs that are sent through the automation.
Conclusion
EngageBay has created several Campaign types to optimize and power up your marketing automation. Using Standard, Automated, Auto Responder, Split (A/B) Testing, RSS Triggered, and Date Based campaigns offer a variety of specialized options. Now you can reach out to your pipeline like never before.
Did this answer your question?


